How to deploy an NFS server and use it on Scaleway cloud instances using VPC?
Depending on the different needs of a cloud project, you may need to work on multiple virtual machines with a shared networked volume. This can come in handy to avoid duplicating files, collaborating or even saving money on your monthly bill which can quickly add up.
Most cloud providers are providing an NFS based product, which allow any virtual instances to get more storage using a Network File System (NFS). For example with AWS, that's the EFS product. For Azure that's the Azure Files, and for GCP, that's Filestore.
If you're already dealing with Scaleway cloud ecosystem, you may have noticed that there is no NFS product, and that the Block Storage product can't be used directly as an NFS volume.
The goal here is to make the volume of instance A available to instance B (for example). This can simplify the task when working with disk-intensive software.
Prerequisite:
-have an active Scaleway account
-related quotas for (2 VMs, and associated Block Storage volume if need)
-have basic skills in technical English
Warning:
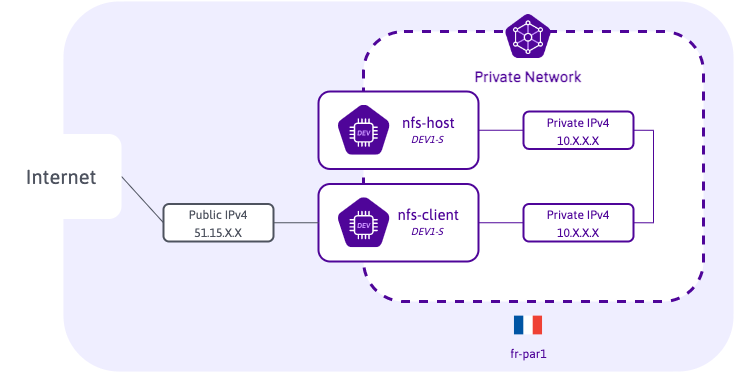
-Please note that for security reasons, our NFS volume will be only privately exposed. We will use the VPC feature (Private Network part), and it will allow us to make this network volume available for the whole VPC.
-Please note that VPCs on Scaleway ecosystem are not regionalized. It means that both instances (host and client) must be in the same availability zone. Eg. 2 instances in fr-par1. If you want to use your NFS volume on another AZ/region/network, you will need to publicly expose your NFS volume.
-Please note that only Instances (VM), and Elastic Metal products will be able to use this NFS volume.
-On this tutorial, I've used an instance as an NFS host, but you can of course use Elastic Metal servers for these host role (especially the Lithium range which is made for storage purposes).
-Please note that on Scaleway cloud instances: private IPv4 are changed each time that you're rebooting your instance (using the reboot button only).
Please note that in this tutorial, we will use Ubuntu 20.04.
Step 0: Create Private Network and add 2 instances
Connect to your Scaleway account, and click on "Private Network" on your left-side navigation bar. Then click on "+ Create a Private Network".
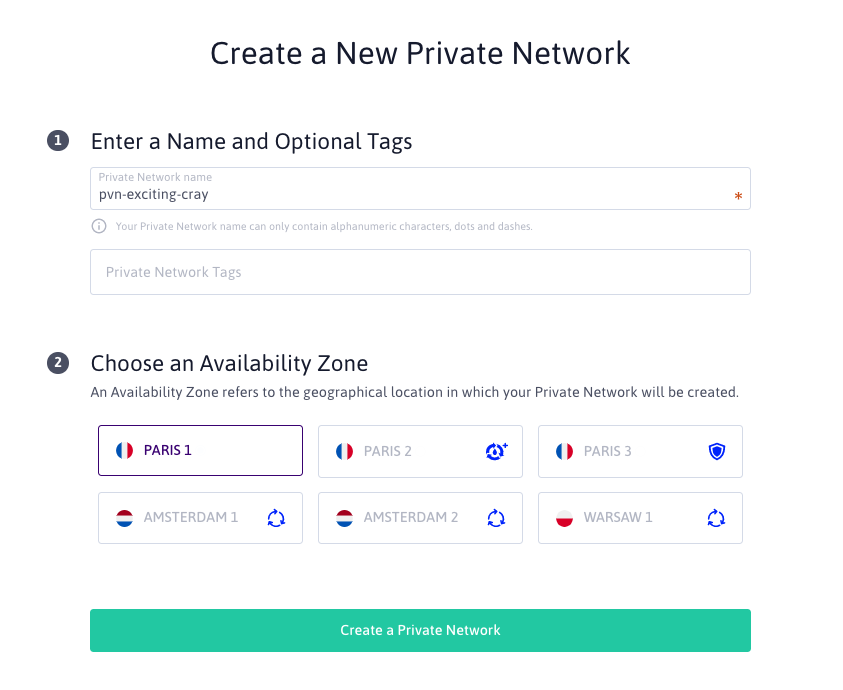
Select the Availability Zone where you want to deploy your NFS host and client.
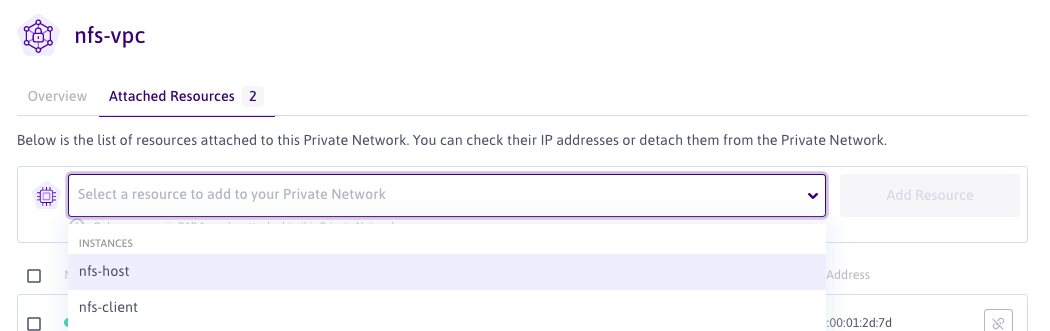
Then, once created, click on "Attached Resources" tab. Once it's done, add your two instances to your Private Network.
Step 1: Create and prepare our NFS host instance
As a reminder, our host instance deployed here is:
DEV1-S instance
-2vCPU
-2GB RAM
-70GB SSD Block Storage
-no public IPv4
Let's connect to our host instance:
ssh root@YourHostInstanceAlso, we will update all packages:
apt update -y && apt upgrade -yNow, let's install NFS specific host packages using:
apt install nfs-kernel-serverNow, we've installed all necessaries packages to host an NFS server, using our first cloud instance.
Please note that for security reasons, I strongly recommend you to detach/disable all IPv4 traffic, in order to avoid any intrusion.
Don't forget to open port 2049 (NFS dedicated port), and authorize traffic only from your NFS client instance.
Step 2: Create and prepare our NFS client instance
As a reminder, our host instance deployed here is:
DEV1-S instance
-2vCPU
-2GB RAM
-20GB SSD Local Storage
-1 public IPv4
Let's connect to our client instance:
ssh root@YourClientInstanceAlso, we will update all packages, as in host instance:
apt update -y && apt upgrade -yAnd for the client part let's install common NFS packages:
apt install nfs-commonStep 3: Configuring our NFS host instance
First, let's create a directory that we will share later. In my case, I will chose the directory /var/shared-nfs/content but you can modify this path. Don't worry, as it will be only displayed on the host.
mkdir /var/shared-nfs/contentWe will also set the owner user, and owner group. As you can see, right now owner group and user is set to root:
> ls -ld /var/nfs/general
drwxr-xr-x 2 root root 4096 Jun  2 17:35 /var/nfs/general
For this tutorial, we will define nobody and nogroup which will be used for actions made by NFS client.
The official Debian documentation is properly defining these 2 users/group, as:
Daemons that need not own any files run as user nobody and group nogroup.
Please note that's the easiest way to proceed, but to enforce security you can create a dedicated user/group.
chown nobody:nogroup /var/shared-nfs/content
# Feel free to replace nobody and nogroup by your user/group
# if you've created dedicated user/group for your NFS usage
Let's continue on our NFS host. Now, we will have to authorize and configure directories that we want to share, permissions, and associated options.
Using your favourite text editor, please edit the etc/exports file:
nano /etc/exportsYou will find commented lines, and an empty file. We will add the following lines:
/var/shared-nfs/content    YourClientPrivIPv4(rw,sync,no_subtree_check)
# Please replace YourClientPrivIPv4 by your instance private IPv4
We've defined specific options like rw, sync and no_subtree_check, which are described in multiple documentations/website. If you want to check permissions that we've defined here, feel free to check this website, which explain it easily.
Please save, and exit this file, modifications are completed for this part.
Now that we've configured this part, we need to restart the NFS host service.
Don't worry, you don't need to restart your instance, just perform this:
systemctl restart nfs-kernel-serverAnd that's it for this host part. We've almost finished this tutorial!
Step 4: Configuring our NFS client and access to our NFS
We have to prepare a directory on our client instance, where our NFS directory will be available.
For example, I want that my NFS directory to be available on this path: /shared/files. Then I will be able to do that this way.
First, let's create this directory:
mkdir /shared/filesAnd now, we need to mount our NFS on this specific directory:
mount YourHostPrivIPv4:/var/shared-nfs/content /shared/files
# Here, my NFS host directory is /var/shared-nfs/content
# and I want to access to this directory using /shared/files
Now, our NFS volume must be properly mounted, and can now be used.
To be sure, you can use a specific command, which will allow you to check that.
df -hAnd you will get the following output:
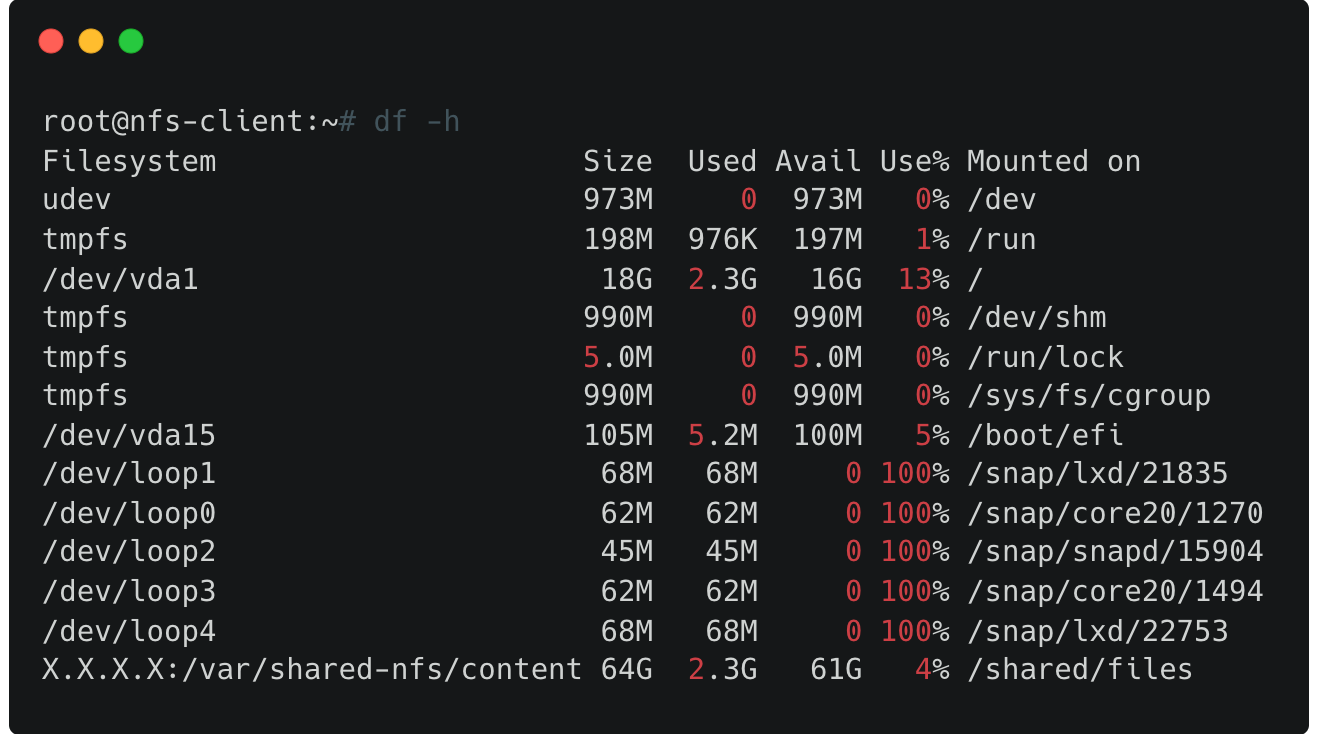
On this last line, the mention of your properly mounted NFS is therefore quite clear. You can now test the file copy.
Congratulations, you've successfully deployed your own NFS server, and you're now ready to use it on Scaleway cloud instances using VPC!